
Ever wonder how to get a grunge texture on top of your designs and photos? Today, you will learn exactly how to elevate your work in Photoshop by using these free grunge brushes. You can use these techniques with your social media graphics, poster designs, logos, and photos.
For this tutorial, we’re going to use a simple rectangle shape with text on top of it, so feel free to create the same. Or, follow along with your own design. Let’s get started!
Download 20 Free Grunge Brushes
First, click the link below to find the download for your free grunge brush pack. There, you’ll also discover even more tips for designing and illustrating with these brushes.
Check Here to Go to Your Grunge Brush Download
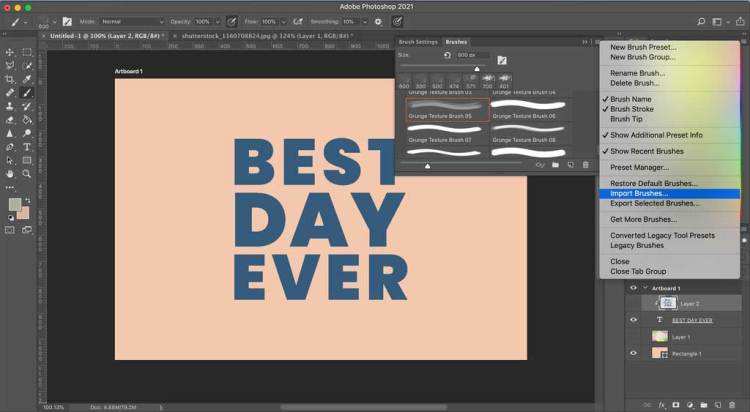
Import Your Brushes
Now let’s import your brushes so you can follow along with this tutorial. Make sure your brush window is available to you in your workspace. If you don’t see it, go to Window and make sure Brushes is checked. From there, click the horizontal line icon on the right to get the option to Import Brushes. Go into your most recent downloads, and make sure you’re opening the .abr file. Now you have your brushes ready to work with!
Add Texture to the Background
Next, we’ll get comfortable using our brushes by starting with the background. Create a new layer and experiment with different brushes, colors, and brush size.
Use your brush panel to see the different brushes you have to work with. If you’d like to make a brush smaller or larger, use these brackets on your keyboard to do so: [ = smaller, ] = larger.
This is your time to play around with each brush and see what kind of result it gives you. Think about building on top of each stroke to create a cohesive texture. There isn’t any rhyme or reason to this, so get messy!

Add Texture to Your Text
We’re going to use a clipping mask to add texture to this text. Clipping masks are perfect for isolating your texture within your text, logo, or shape. First, create a new layer. Use your brushes on this layer to create a new texture.
I’m adding similar colors in a slightly darker and lighter hue to create a more subtle look. Then, I’ll use the eyedropper tool to take a sample of the peach background color and add a small texture on top of it.
Once your texture is done, you’re going to head to your Layers panel. Hover between your Textured layer and Text layer, while holding down alt/option. There, you’ll see the clipping mask icon. Click in-between both layers to create your clipping mask.

Add a Subtle Grunge Texture to Your Photos
These grunge brushes are the best way to add a vintage touch to your photos. For this effect, let’s use a more subtle brush.
First, create a new layer on top of your photo. In this photo, I’m using the eyedropper to grab a light color for my brush. Then, I’ll create texture on this layer using this brush.

Once you’ve created your subtle texture, use your blend modes to blend this texture into your photo. My favorite blend modes for these are Overlay and Soft Light. Feel free to experiment with each one to see which one works best for you.
That’s it for today! Feel free to get messy with these brushes while you sample each one. The purpose of this grunge effect is to not be overly perfect or designed. If you want to learn other ways to use these brushes, check out How to Use 20 FREE Photoshop Grunge Brushes. Have fun and we’ll see you next time!
Looking for a simple place to start? Create has you covered with over 400,000 assets, 1,500 templates, 500 fonts, and countless free tools to help you design like a pro.
License this cover image via Nella.


